Winter Bicycle Riding Made Easy
Winter can wreak havoc on the practical pedaler. Throughout much of the country, Mother Nature serves up heaping helpings of snow, sleet, ice, and hail. Think commuting through these conditions is difficult in a car? Try it on a bicycle.
Snow and ice test a bicycling commuter's principles and agility. I am the father in a one-car family of four. As public transit in my part of the world leaves much to be desired, I have little choice but to brave the elements--and try my balance--on two wheels. For me, bicycling is a year-round commitment, not a fair-weather endeavor.
The obvious constraints aside, winter cycling is not without pleasure. The feeling of riding a bicycle through virgin powder is akin to skiing, offering a distinctly serene experience. The challenge of pedaling through the snow and ice is a pleasant challenge. Though people may look at you funny or go out of their way to call you crazy, snow cycling offers us the chance to appreciate Mother Nature and human balance in a way that is not available in fairer weather.
I have logged many miles on icy roads and trails during my winter commutes. Through trial and error (but no broken bones,) I have learned that having the proper equipment, clothing, and technique can ensure a truly pleasurable cycling experience. My co-workers wonder if I am an inspiration or just a whack-job. I like to think the former. As such, I offer a few tips that I hope will inspire legions of cyclists to embrace wintertime cycling.
Winter cycling is tough on bikes. Conditions are unpredictable and you need a frame that can handle changing terrain (packed snow, powder, ice, and slush.) That means generous wheel clearances to accommodate wider tires when they're needed. Snow and ice accumulation on the rims is an inherent condition that can be problematic for braking. For these reasons, road bikes with skinny tires and caliper brakes do not make ideal snow-cycling commuters. Mountain bike frames and cross bikes are your best bet. Shoot for frame-and-fork combinations that allow 700x35 (or 26x1.5") tires or wider and cantilever or linear-pull brakes. It can be a challenge to stop a bike that has cold rims and ice stuck between the brake shoes and the wheel. Linear-pull and cantilever brakes with a quality wet/dry brake shoe offer tremendous braking force, providing peace of mind and a respectable stopping distance.
Invest in quality snow tires. The best have carbide studs embedded into generous-sized knobs. Studded snow tires are not cheap, but they are your only connection between the bike and the ice. The traction they provide—and hence the safety they offer—are invaluable. Nokian and Schwalbe offer several sizes and styles for different winter riding conditions. I find the Nokian Hakkapelliitta W106 a fantastic tire for commuting through the Midwestern winter. A good studded snow tire is a trustworthy addition to your winter riding gear and they're cheaper than a trip to the hospital.
Low handlebars and ice are incompatible. Handlebars that sit below the level of the seat encourage a rider to move forward on the bike, placing more weight over the front wheel. This weight shift reduces traction at the rear wheel and makes a front-wheel washout more likely (more on this later, under "Technique".) Almost any handlebar can provide good leverage for the tricky conditions and encourage a more traction-grabbing upright position as long as it's mounted high enough. Even drop bars can work well. A set of wide cross-style drops on a tall stem can be the best of both worlds, giving you a high riding position in the hoods while still allowing for a lower position should you run across a dry patch of road with a stiff headwind. Of course, mountain bike bars—flat or raised—are fine. But don't rule out moustache bars, or my personal favorite, butterfly / trekking bars. Just make sure the bars are raised high enough to better encourage an upright riding position.
The final accessory to consider is a pair of fenders with mud flaps. A variety of snow conditions are encountered while commuting on a bicycle. There will be trails with virgin powder; shady sections and bridges with ice; brown slushy stuff (affectionately referred to as chocolate mousse or oatmeal snow) along curbs and gutters, and wet conditions in the roadway. Fenders help keep your shoes and pants clean and dry.
Mud flaps are essential in any community that inhibits ice by spreading salt on roads. Anyone who has lived on the East Coast understands the corrosive properties salt has on the undercarriages of automobiles. Salt has the same corrosive properties on your bicycle as well. Salt can cause pitting on aluminum frames and rust on steel frames. Shift cables that run under the bottom bracket are especially vulnerable to this corrosion. Unfortunately, most front fenders do not extend far enough behind the wheel to protect the lower portions of your bike frame from saltwater splash. Enter the mud flap. Mud flaps need not be pretty, just practical; a piece of leather or even a plastic water bottle or pop can, cut in half lengthwise, will do a superb job. Just affix it to your fender with a single screw.
There is a reason snow-fencing is orange: it is highly visible against a blanket of white. Choose clothes as you'd choose snow fencing. Colors such as "construction-worker" orange, red, day-glo yellows, greens, and pinks won't improve your fashion, but they will get you noticed. Reflective tape or other markings are a smart option as well. The slightest breeze can blow fresh powder in the air, reducing visibility for motorists even in the middle of the day. Do your best to ensure you are seen, especially during snow flurries. Cover areas of the body most prone to frostbite: nose, ears, fingers, and feet. A balaclava works great, but you may find it is actually too warm. Cycling through the snow is quite a workout, and I prefer to give heat an easy escape route through my head. I use a neoprene mask that covers only my ears, nose, lips and chin. If conditions are really cold, I cover some of the helmet vents with tape; cheap, easy, and flexible for those late Fall/early Spring days when temperatures are frigid in the morning but warmer by the late afternoon.
Glare can be blinding on the snow, and sunglasses are essential. A pair with polarized lenses offers the best protection against horizontal glare. Polarized lenses also help during evening commutes when oncoming headlights can be hard on the eyes. Ski goggles are a great alternative to sunglasses as they are designed to keep the eyes warm and the lenses fog-free.
Few realize the physical exertion needed to cycle through snow. It is more than a leg workout; your entire body is exhausted. Your quads work harder than normal plowing through powder; your obliques are constantly tightening to help maintain balance; your arms and back keep the front tire light over bumpy terrain or areas of snow accumulation. As such, your jacket and pants do not need to be as heavy as one might assume. I often wear a light pair of ski pants and jacket, with nothing extra underneath. Wind is the biggest enemy, and heavier clothing may be required during blustery days, But in the wind's absence, you will generate a tremendous amount of heat, enough to keep you warm even in single-digit temperatures.
Since winter cycling has not become as popular as it should be, you may not have much luck finding the right winter clothing at your local bike store. The best offering will be found at ski shops, especially ones that sell cross-country ski gear. Try lighter gear first. You want to be comfortable, but nimble and flexible. You can always layer.
You will slip and slide in the snow, it is inevitable. But the temporary loss of traction is what makes snow cycling a workout filled with thrills. The trick is to avoid the spills. It is difficult for the novice, but you must train yourself not to put your feet down every time your wheels slide. "Ride it out", I keep telling myself. Your studded snow tires actually provide better traction on ice and packed snow than the soles of your shoes. I've found that putting my feet down actually increases my chances of falling. Here are a few techniques that can help improve your balance and keep you upright.
Keep moving. Regardless of terrain, it is more difficult to maintain balance on two wheels the slower you move. This seems to be amplified on snow and ice. Plow ahead, and keep your crank spinning. This means you may have to gear down a bit, but momentum greatly aids in keeping you upright. Remember it is the rear wheel that provides the traction and the front wheel steers direction. "No duh", but remembering this simple law of physics is imperative for slide-free snow cycling. If your rear wheel slides a couple of inches from side to side (and it will) there is little risk of falling if you "ride it out". If your front tire slips just one inch to the side, however, you are going down. Keep your weight back on the frame, over the rear wheel and keep as much weight off the front wheel as possible. Low handle bars, as mentioned earlier, are not good for winter riding. Lower your center of gravity in the wintertime. On dry pavement, proper saddle height allows for a full leg extension on the downward stroke. This maximizes power and efficiency. However, it also raises the center of gravity for the bike and bike rider and moves your weight forward. For ice, snow, or other slippery conditions, a lower center of gravity is required. This is easily achieved by lowering saddle height an inch. This also helps prevent falls if you have to put your foot down.
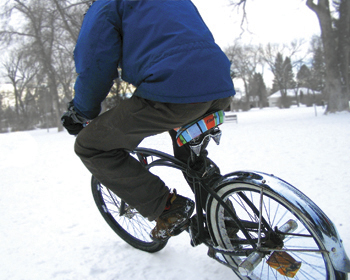
Stay seated; standing raises the center of gravity and transitions weight from the rear wheel to the front. Traction is lost, and the risk of a wipe-out greatly increases. Try to limit how much contact your front tire has with the snow. This often means a lot of lifting is done on the handlebars (like when you want to pop a wheelie). Whenever the surface ahead appears ruddy, or is laden with obstacles (that oatmeal or chocolate-mousse), keep your front wheel as light as possible. It helps smooth out the ride over those uneven surfaces.
Pay keen attention to the type of snow or ice you are crossing. Powder is actually relatively easy to ride through…it just takes a lot of leg strength. Keep momentum through powder by gearing down. Packed snow, especially if ruts are present from cars and trucks, can be exceptionally slippery. The snow fills the spaces between the tire's knobs, and studs have little holding power. This type of condition will often yield the most fish-tailing. Again, avoid the urge to put your feet down and ride it out. Ice is surprisingly easy to cycle over, so long as you have studded tires. The trick is to maintain a steady speed and direction. Abrupt changes in speed or direction will usually land you on your bum. Chocolate mousse (that slushy brown stuff most often found at intersections and along the sides of roads) appears relatively harmless, but it is deceptively treacherous. Knobbies and steel studs have little holding power through slush. Anyone who has ever tried to carve a turn on skis through slushy conditions understands. It is just plain difficult to move through. The cycling technique is similar to ice: maintain a slow, but steady speed and direction.
These tips should help provide an enjoyable and safe winter biking experience. When I began to experiment with snow-cycling, I had nobody to follow or learn from. Through fits and starts, I found what works in a variety of Midwestern snow conditions. Following these suggestions should dramatically reduce the time it takes for you to get comfortable on a bike in the snow. Caution is still advised, however. As with any attempt to learn a new skill, go slow at first. Practice on your street during a weekend, not on a busy arterial on your way to work or school. You will be surprised, however, that with the right equipment, and a few modifications in biking technique how easy--and fun--cycling through the snow can be.